Capturing proximity light from HDRIs for better CG integration
Learning to love proximity
Among the many lessons learned on a recent project? Using a HDRI isn't always a set-it-and-forget-it exercise.
There are plenty of terrific tutorials that plop in a HDRI to light a scene; and many more that round out a render by using the same HDRI as a background for the shot. A couple of clicks - and hey presto - perfect lighting.
Turns out in many cases that's only half the story. What may be all well and good for a static render may not get you very far when it comes to an animated shot or CG integration with live action. Our eyes are very attuned to subtle differences in light and watching a CG element move through a scene without any change in light is a dead giveaway that something's wrong. But wrong is what you'll get with a single HDRI lighting your scene.
If we want to get the most out of our HDRI in these situations, the trick is to also leverage the HDRI for "scene reconstruction" – enveloping our scene with textured geometry containing all that 32 bit lighting goodness so as CG elements pass through, around, above, or under these meshes, lighting conditions change.
Put another way: the trouble with a single HDRI setup is that the lighting information is effectively coming from an infinite distance rather like setting up a sun lamp. By also baking that HDRI information into geometry in proximity with our CG elements, we've created something that will reflect both overall lighting AND positional lighting.
Preparing your scene
We're going to build simple geometry around our CG element to hold that positional lighting. This doesn't have to be anything more than a series of planes and cubes. But what it does need to accurately capture is the positional reconstruction of the architectural space captured in your HDRI. I like to think of it like those old Western movie sets where only the front of the buildings exist like giant saloon-shaped billboards. I call this a Lighting Set.
But before we get to building the set, the first step is to get your HDRI working the way you want it. Setting it up with the appropriate strength - and particularly important - rotation relative to your scene. This has been covered by plenty of other folks, so I won't repeat it here. In the case of my project I was quite far into compositing at this point, feeling good about the overall lighting, position and animation of geometry before refining the lighting by making it positional.
Why wait? Well, if you change the rotation of your HDRI later, you'll have to rotate any geometry you've made to match. If you swap out your HDRI entirely, you may have to reconstruct that geometry all over again.

CG drone rendered in Blender Cycles, composited into footage in Nuke. The wire fence is rotoscoped to appear in front of the drone.
In my project I have a flying drone that drops down into camera view between two buildings in an alleyway. While the walls of the neighboring buildings forming this alleyway are captured in the HDRI I shot on set, their proximity to the drone's position isn't. Furthermore, in this particular case, I couldn't position the HDRI exactly where I needed it (behind the wire fence, above the cars) and instead shot it from the same location I shot my footage (on the sidewalk in front of the fence with no buildings either side of me.) We can fix both of these issues by building a Lighting Set.
Setting up your "RECONSTRUCTION CAMERA"
I'm going to walk through the following exercise in Blender, but the principles are the same if you use a different CG weapon of choice.
First, make sure your HDRI is visible in your viewport when working in non-rendered viewport shading views by opening the viewport properties panel with N, scrolling down to “Display” and making sure “World Background” is checked. Depending on the filesize of your HDRI, it may take a few seconds to appear.

Use the N key to open up the viewport properties panel and check "World Background" under "Display".
Before we can start building our Lighting Set we need to add a suitable camera to eyeball lining up the geometry to our HDRI environment. Set up a camera at the 0,0,0 origin (effectively the exact center of your HDRI). Hit 0 on your numpad (you do have a numpad don't you?) or View > Cameras > Active Camera and you'll be transported to your camera view - a POV equivalent to the position from which your HDRI was shot.
Now here's a useful trick. Pressing SHIFT+F when looking through your camera will allow you to look around your scene with your mouse. From this point forward, we'll use this camera view NOT the default perspective view during the assembly of our Lighting Set to give us the correct POV (Point of View) to align geometry with our HDRI environment. Other software packages use the term “Look through Camera” or something similar.

Looking through the "Reconstruction Camera".
Adding your "Lighting Set"
We can now start assembling geometry in our scene to match the major structures captured in our HDRI. The best place to start is to add a simple plane as a ground reference. Even if you don't end up using the plane, it'll give you a good anchor to start additional geometry. If you took measurements on set for the height of your tripod during the HDRI shot you'll have a good starting point as to how much to lower the plane beneath the camera position. If you didn't, a little bit of trial and error will get you where you need it.
The trick is to keep your (Numpad 0) camera view as your POV during set construction and alternate between using SHIFT+F to adjust your view as needed with your mouse and then moving the geometry in the viewport from that view. Scaling, rotating and moving the geometry you add works well, as does TABBING in and out of edit mode and grabbing edges and moving those.

Lining up a plane with the ground is a great place to start. In my case I can use the sidewalk and gutter to guide me.
Edit your plane as needed to line up with key parts of your environment. In my case I was able to use the sidewalk and the sides of the buildings as reference points. Make sure to occasionally look around with SHIFT+F to make sure your placement holds up. If everything is correctly located, as you look around the plane you've placed will correctly line up with your HDRI. This combination of camera view, and using "mouse look" ensure you're making placement decisions from the same POV of the original HDRI.
From here, extruding edges of the plane up into Z will start to construct the side of buildings or other vertical features captured in your HDRI. In my example, extruding an edge along X or Y extends the plane down the street. One additional tip - working in wireframe mode will allow you to see through the geometry you’re placing to better line up key edges with the HDRI.
As previously mentioned, the geometry doesn't need to be complex, just enough to surround any CG elements you intend to animate. Again think “Movie Set” - just what you need.
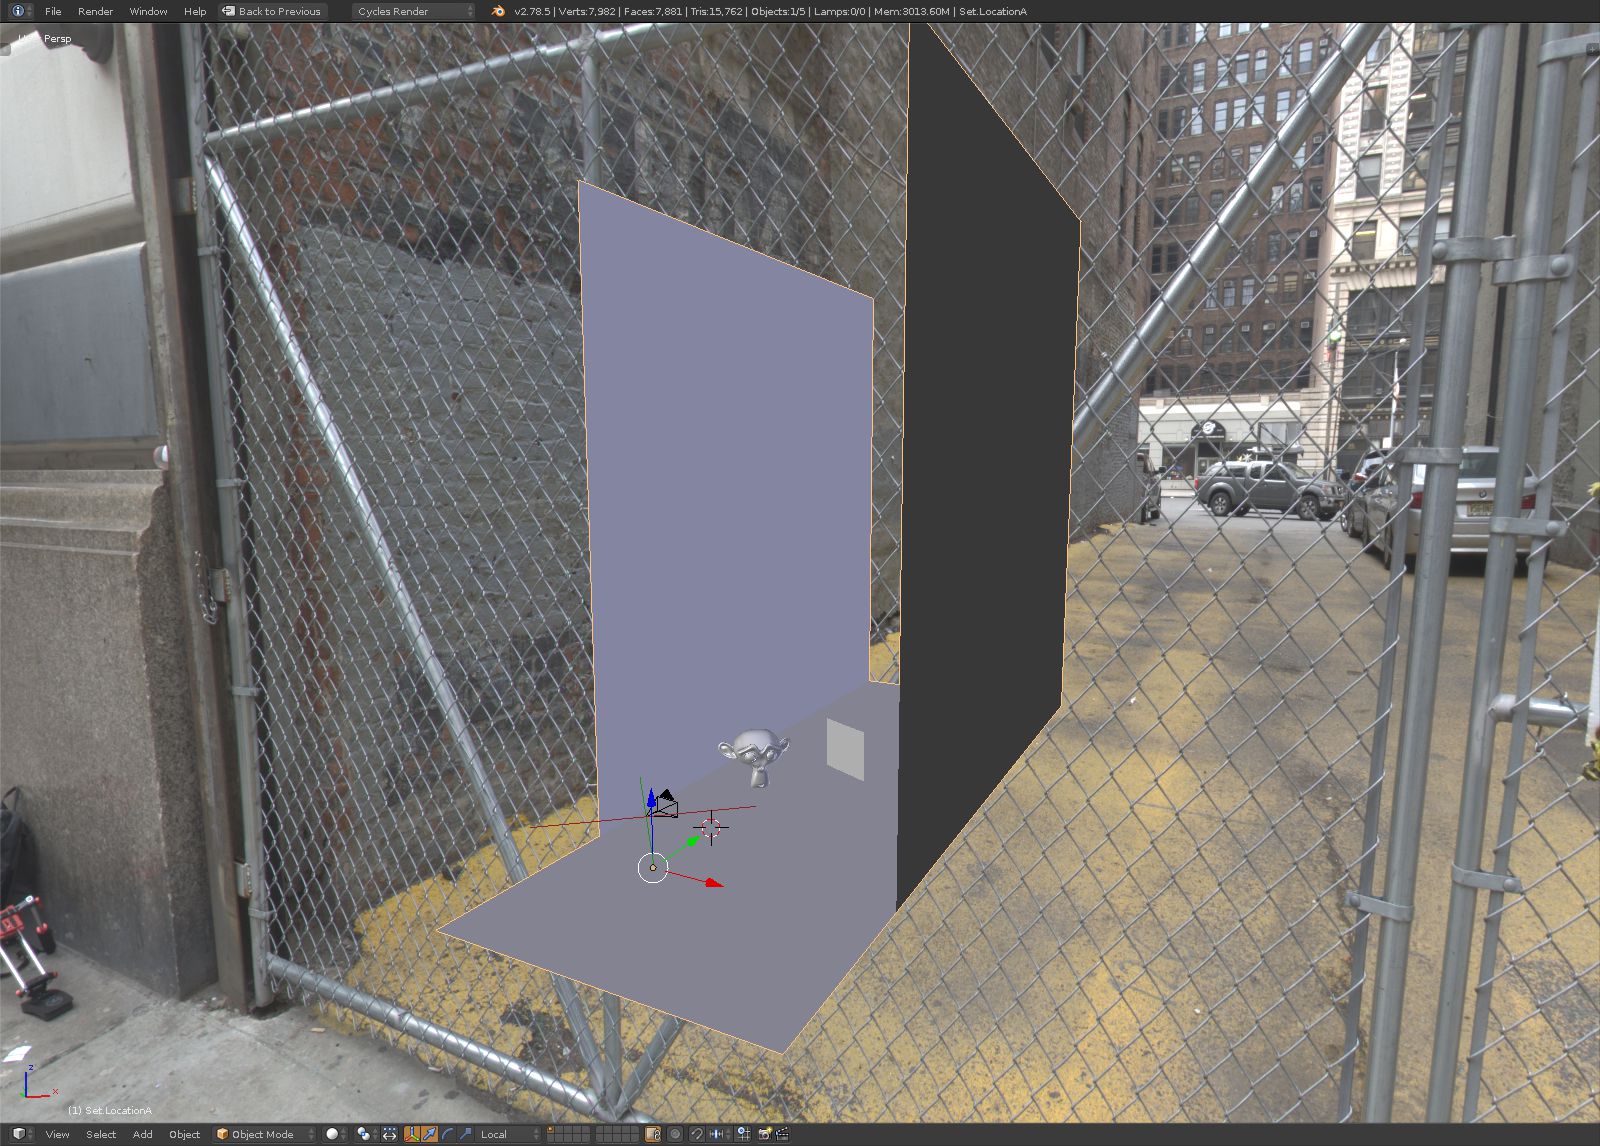
My simple set. Two walls either side of the alleyway, the ground, and the sidewalk. Note the position of Suzanne and a color-checker card.
Adding THE HDRI light information to your LIGHTING SET
With our Lighting Set in place it's time to add all that delicious lighting information from our HDRI. We’re going to do this by baking the environment to a texture on the set geometry. The key is the texture we bake will be 32 bit to retain the dynamic range of the lighting data.
Use OBJECT > APPLY > SCALE to fix any scaling issues you created while making the set. This will make sure you don’t encounter any weird scaling issues with your UVs. Then unwrap the UVs. The automatic UV unwrapping approach under the viewport tools panel (T) > Shading/UVs tab will be plenty fine enough for this job.
In the UV/Image Editor panel hit the + button in the menu to set up a new texture to receive the bake. Set up the blank texture as large as you can afford - at least 4K to capture all that HDRI detail and - critical - make sure the texture is set to 32 bit float to capture the dynamic range offered by the HDRI.
When baking in Cycles it’s necessary that there at least be an image texture node in the material’s shader node group even if it’s not plugged into anything. Give your set a simple Cycles diffuse shader and add an image texture node and point it to the blank texture file you just set up. To bake the environment, in the properties panel Render tab, scroll down to Bake, and choose “Environment” from the drop-down. Make sure your reconstructed set is actively selected in the viewport and click “Bake.”

The bake might take a while, so be patient. Once the baking is complete, make sure you save your image to a file from the UV/Image Editor window or you’ll loose the bake if you close the .blend file. And remember, when prompted, save the texture to a 32-bit format, EXR.

The baked set. Note how the wire fence is cast on the walls and ground. Good enough for the lighting data we need. The key captures are the yellow ground and brick walls.
LET THERE BE LIGHT
With our texture baked, swap out the material shader for the Lighting Set from diffuse to an emission shader, set the emission strength to half the strength of your HDRI emission strength as a starting point. Example: in my case the HDRI is set to a strength of 2, therefore my textured set shader is set to an emission strength of 1.
Enter the camera POV with Numpad 0 and select the render shaded view in the viewport. If the emission strength of your set material is correct, the set should appear no lighter or darker than the background HDRI in the viewport seamlessly matching without any visible edges.
Congratulations you now have a Lighting Set. Use this light-emitting set in combination with your existing HDRI (to cover aspects you didn't model, like the sky or distant features) and you'll have not just environmental lighting but positional lighting as well.
Depending on the camera needs in your shot, you may need to move the Lighting Set onto it's own render layer so that it imparts light onto your hero elements but doesn't appear in your render. If that’s the case, select your set, hit M and move it to its own render layer. Then when you render use your "Render Layers" tab in the Properties panel to make sure the "Scene" includes both layers - the CG elements you care about - and your Lighting Set, but the "Layer" setting only includes the elements you wish to appear in the render.
The results
The results can be quite dramatic or quite subtle, demonstrating how “off” your HDRI may potentially have been.

INCORRECT: I've moved Suzanne into the alleyway but she is only lit with the HDRI as it was shot from the sidewalk.

CORRECT: Using the Lighting Set in combination with the HDRI darkens Suzanne appropriately for the alleyway and the set geometry occludes some buildings in her reflection. She also takes on more of the ambient yellow from the ground.
Okay, so that was a subtle shift. Plus it's just a static image, but the change is still critical to more convincing integration. Here's the difference it made in my shot where the effect is more pronounced:

INCORRECT: With just the HDRI the drone appears brighter and light reflections on the left and right represent the street where the camera was positioned, not the alleyway. Lighting remains the same throughout the animation.
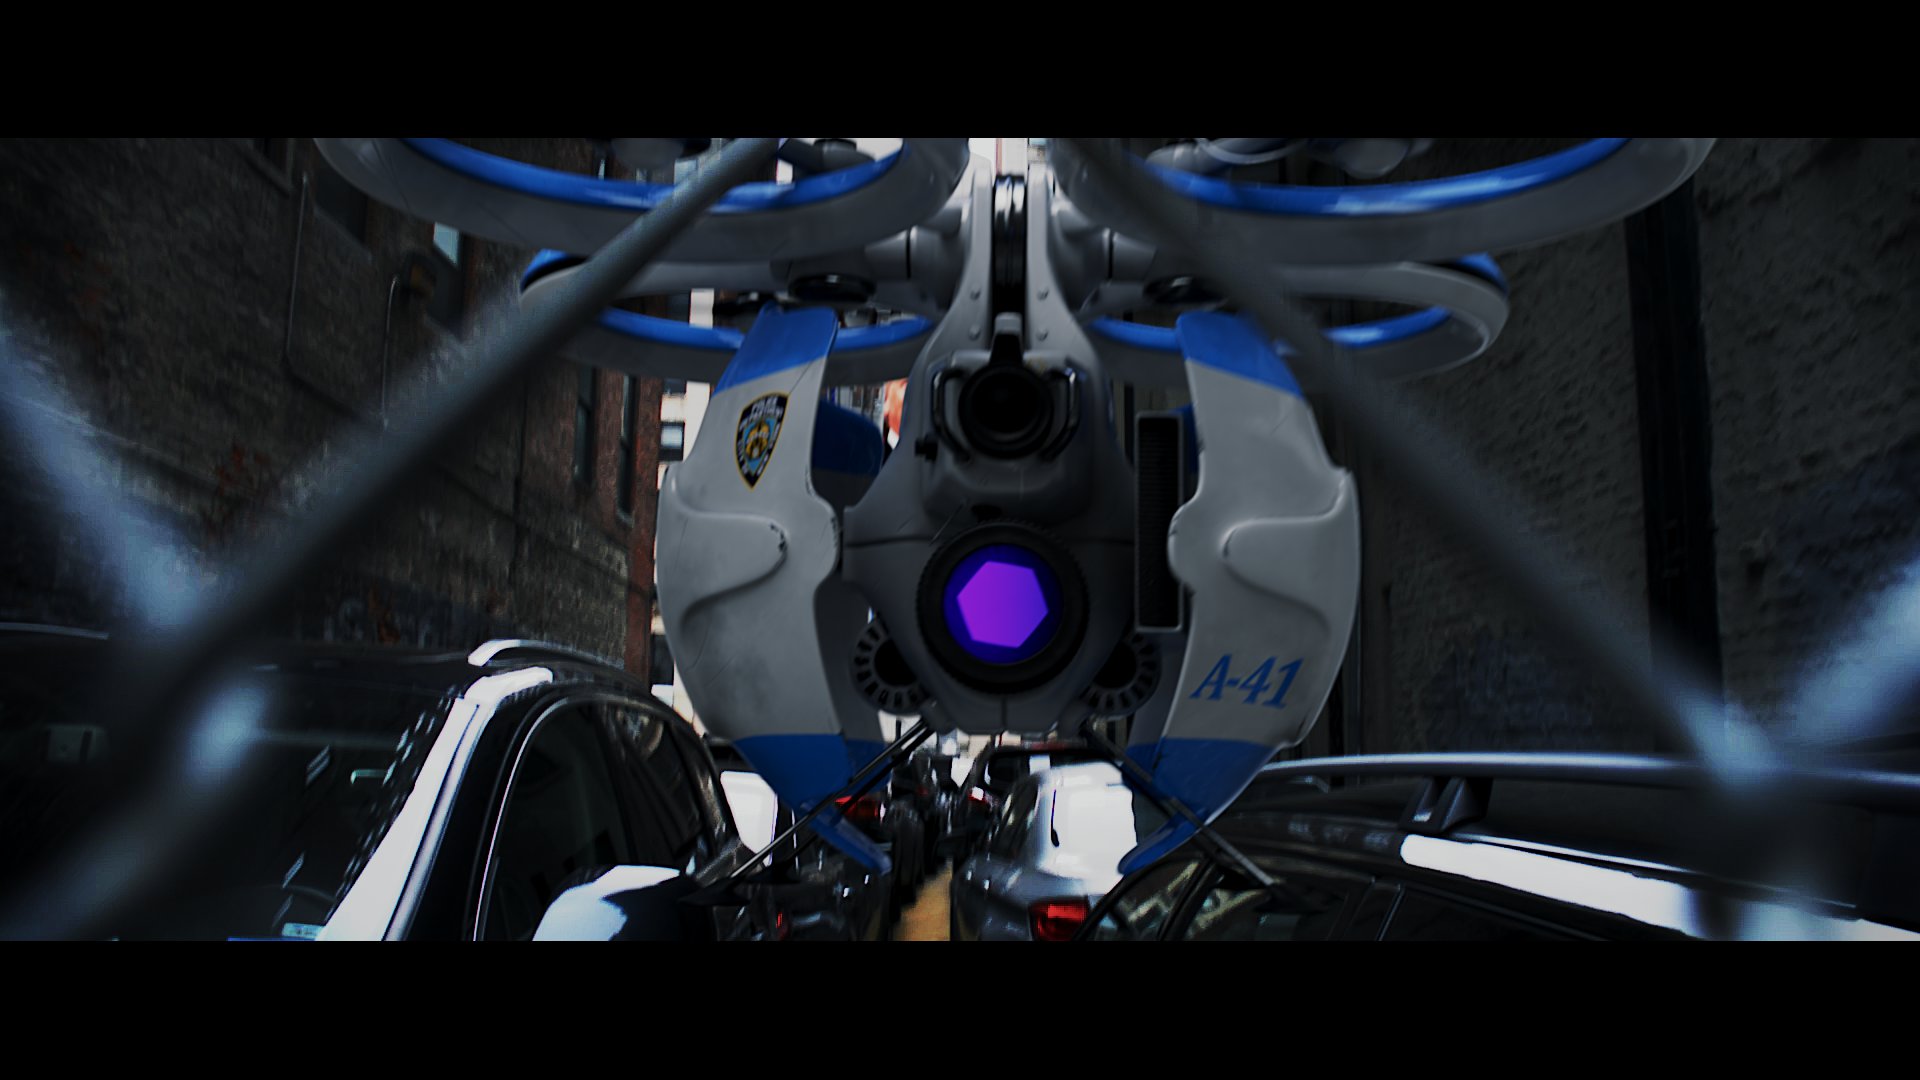
CORRECT: With the lighting set in combination with the HDRI, the drone is appropriately more darker, with daylight only visible from the sky above. Lighting conditions subtly change as the animated drone drops into view.
Okay, okay, so much of the change in light conditions came from the fact that I effectively “moved” the drone into the area behind the fence using my Lighting Set to impart a darker set of lighting conditions whereas the original HDRI was shot from the sidewalk where no walls occluded daylight to camera left or right. So to an extent the result is to be expected.
So here’s a more dramatic example. I’ve created a HDRI of a hallway with red, blue, and green lights. The panoramic camera that was used to render the HDRI was captured in the exact middle of the hallway under the blue light.

The HDRI. Note the blue light above the camera and green and red light to either side.
Now, I capture an 8 bit image of the same hallway I made to create the HDRI to use as a background plate (imparting no lighting information). Over the top I composite in the animation of Suzanne. For the sake of simplicity I won’t set up any shadow catchers or any other tricks to integrate Suzanne into the hallway scene. Here’s the node setup:

No lighting cheats here. Just a render layer lit by the HDRI with an Alpha Over node to composite it over a static background.
And here’s the resulting animated composite:

For an HD video version click here.
Notice how the lighting conditions on Suzanne don't change. Now the issue becomes much clearer. Imagine this was a physical shoot. I shot a background plate “on set” - the hallway. And I was smart enough to capture an HDRI on set as well. Everything I need to composite in a CG Suzanne later right? Well, partially right, but Suzanne is ONLY lit by the original HDRI that was shot from a central location under the blue light.
Now let's make a Lighting Set. Once the texture is baked, it looks like this (and note the original HDRI showing in the world background):

The Lighting Set surrounded by the HDRI. Suzanne is inside the rectangular set. The selected camera is the render camera for the animation.
Now if I render the animation lighting Suzanne with both the HDRI (probably not necessary in this case because she's fully occluded) AND the lighting set, I get this:

For an HD video version click here.
Much better. Now of course, in such a painfully simple setup I could have simply rebuilt the entire set in CG to light the animation dynamically with emissive area lights, but hopefully you get the idea. A Lighting Set can impart the proximity of lighting onto a CG element, not just a distant general lighting scheme from an HDRI alone.
Final thoughts
What I've demonstrated here is only really designed for a small amount of movement within a relatively confined area but it does much more accurately reflect the actual lighting "on set" and allows for some subtlety in the way light changes with any animated elements.
If you're planning on moving a CG element from one significant lighting condition to another – say from under a building to out in the open – you really need to capture additional HDRIs for each significant lighting condition on set and at the very least animate your lighting between those HDRIs as key CG elements move. Better yet is to then build multiple Lighting Sets as described and even potentially merge them into one larger Lighting Set that represents several conditions.
These days on most major movie shoots, a LIDAR is used to capture all that sweet physical geometry of the set, but that type of equipment is outside the range of most hobbyists or freelancers. What we've done is a sort of poor-man's version.
For an intermediate approach between what I’ve demonstrated and a full on LIDAR shoot, Xuan Prada has an excellent in-depth tutorial on capturing proximity lighting as part of a larger data capture. In his case, he goes all out and actually combines photogrammetry with HDRI exposure bracketing to not only fully reconstruct the actual set as it existed in real life (a LIDAR alternative), but also bakes it with usable 32bit lighting information from every conceivable angle giving him a very accurate Lighting Set. That's a lot of grunt work but it solves two needs. One, his location sees significant differences in lighting conditions from extreme light to extreme dark, something that couldn't be accurately captured with a single HDRI, and two, the photogrammetry gets you two-thirds of the way to digital set reconstruction, measurements, and motion tracking.
Thanks
If you’ve found this post hopeful, please consider following me on Twitter for updates on future posts.
Finally, a huge thanks has to go to Troy Sobotka, industry veteran, and the brain behind Filmic Blender (standard in Blender as of version 2.79) and a huge wealth of knowledge on all things color and lighting who walked me through the basic principles behind this lighting approach during the production of my drone project. Be sure to follow him on Twitter.